Friday, 5 March 2010
Evaluation
My overall evaluation of this project is that for my work personally i am satisfied. Although i believe i could have pushed myself further, i like to come out at the end of term and think that i've come out with something i'm proud of.
I think that it wasn't a big help that we lost two or three weeks due to weather and we didn't even have a full team until the fourth week in the project. So the group kept on evolving and changing ideas until time crept away until we had nothing concrete and pretty much went in a circle of a Templar or King Arthur theme. The castle/church idea came about because i thought it would be helpful having source material on your doorstep.
The things i would do differently would be to maybe nominate a leader, i got the feeling i sort of had that role because i would always ask questions about what was happening with the project, who was doing what for when and what the team had to accomplish. Although i wish that we had the scheduling lecture earlier on as i think that would have been a great help. I usually just write little to do lists but don't think far enough ahead. Maybe if we had done this Matt would have been able to do his animation on top of the footage so we would know what needs to be done before he can start working on that.
I would set myself targets and actually stick to them instead of letting them slide, but again the scheduling would let me see how that would affect me later in the project.
What could i improve upon?
I would have liked to ave spent more time on camera moves and understood filmic language, as a want to be animator i feel i should certainly understand the basics.
I would have liked to have experimented with textures maybe by making crazy things, scanning them into the computer and applying them to my bump map, i forget not everything has to be made on a computer, i miss that practical side of getting stuck in, also i miss that about a sketch book for submission. I didn't really exceed in the lighting either, but i feel that i know what the basic capabilities are for each one and that i can build on that knowledge in the future.
What do i think i worked well on?
I really like some of the camera shots i came up with for the dock scene, before the final render we see in this post. The light gave the warmth and i could see how it should all fall together.
Also i was quite surprised at how simple i found it to model and texture the scene, i only found difficulty with the prophecy because of the images and using a bump, i would have liked to have made it look like a tapestry.
Overall i did enjoy the project but wish it could have come together more, i feel i lost my motive part way through as we as a group couldn't finalize on an idea, i wanted to make sure it had a purpose and i would have liked to take the Rochester Cathedral up on their co-operation for modeling the Cathedral in its stages. I'm already thinking what i would liek to focus on next term whether animating, modeling ect. I think this project has let me explore more with modeling an environment, but i do miss animating.
The end of the day..
I haven't blogged the past two days as i've been working on this project and the industry exercise project.
Basically whats been going on is explained a little in the facebook. By the end of Thursday we as a group worked on what camera shots were needed on a list and then me and hayley created the camera sets and sent them to the team. Which we had then all taken certain cameras away to render out for Friday, ready to composite and hand in. However, i failed to put my mind in gear and ask the question as to how many frames needed to be rendered on each and to make sure the team kenw to edit the cameras themselves, me and hayley just placed basic cameras.
Come Friday morning, Matt and i had taken the same file and i had not understood why my render wasn't working with the light as it came out as below..
I checked that the project was set and all the smaller things it could have been, in the long run i believe it was a corrupt file where i ended up having to re create the lights. Sam had mentioned that problem but it failed to reach my ears as i was working away.
So that's what backed up the possible progress we would have made friday on compositing, however i think the castle scenes were overlooked for camera moves. I drew some rough boards for the dock but left the castle for the rest of the group to work on.
So i as Matt and i had un-rendered cameras we had to spend the time in the day rendering out the cameras properly, whilst i was still working on the other project too. We managed to get the rendered scenes in the end and i added to Sams rough composite of the castle renders to the dock entrance.
I will post the evaluation and the final composited footage in the next post.
Basically whats been going on is explained a little in the facebook. By the end of Thursday we as a group worked on what camera shots were needed on a list and then me and hayley created the camera sets and sent them to the team. Which we had then all taken certain cameras away to render out for Friday, ready to composite and hand in. However, i failed to put my mind in gear and ask the question as to how many frames needed to be rendered on each and to make sure the team kenw to edit the cameras themselves, me and hayley just placed basic cameras.
Come Friday morning, Matt and i had taken the same file and i had not understood why my render wasn't working with the light as it came out as below..

I checked that the project was set and all the smaller things it could have been, in the long run i believe it was a corrupt file where i ended up having to re create the lights. Sam had mentioned that problem but it failed to reach my ears as i was working away.
So that's what backed up the possible progress we would have made friday on compositing, however i think the castle scenes were overlooked for camera moves. I drew some rough boards for the dock but left the castle for the rest of the group to work on.
So i as Matt and i had un-rendered cameras we had to spend the time in the day rendering out the cameras properly, whilst i was still working on the other project too. We managed to get the rendered scenes in the end and i added to Sams rough composite of the castle renders to the dock entrance.
I will post the evaluation and the final composited footage in the next post.
Facebook 2
what we up to?
Between Andi Bennett, Matt Vadis, Hayley Allen, Sam Mcguire and You
Lydia Fabian 23 February at 09:36
Hey guys,
just thinking we havent come together in a while.
how's everyone's work going or not as it may be?
Sam Mcguire 23 February at 13:15 Reply
well ive done more texturing keeping a basic palette for the clone wars look
Lydia Fabian 23 February at 14:31
i've done some texturing just to set up the uvs. roughly added.
you in tomorrow?
Sam Mcguire 23 February at 14:59 Reply
yeah of course we're meant be in, dont worry unless we get 10 inches of snow i will be there
Matt Vadis 23 February at 15:46 Reply
'Sup y'all. I wont be in tomorrow, working on steve's unit from home. But i'll def be in on thurs so we can catch up.
Hayley Allen 23 February at 17:02 Reply
I wont be in tomorrow. im having trouble rendering the oil think it may be my laptop, bt otherwise its going ok. if my textures are too complex i dnt mind simplifying them. hope everyone is getting on ok are we going in everyday next week?x x
Sent via Facebook Mobile
Lydia Fabian 26 February at 18:41
hey im planning to have my textures all done by monday when we meet.
hayley what texture is complex?
im going to stick some stuff on the blog by end of tonight for what iv been up to .
sam are you good for texturing?
i worked the lighting so i will take some screenshots of the lighting in the file you gave me n andi yesterday yes?
on our to do list we have
Lighting
Texturing
Storyboards
Animatic
Animating
Rendering Maya scenes
Compositing
Rendering final movie
So if we crack texturing thats one off the list. and im lighting now.
Andi Bennett 26 February at 18:56 Reply
just finishing texturing... going quite well... still have to work on my womaaaaan.
Lydia Fabian 01 March at 21:11
Hey guys, i know we were all planning to go in tomorrow, but i'm wondering if we could not just get on with our work at home?
Me and sam lost time today that we could have spent on the other project because we went in college, the idea was to come into college today. I know matt was in, andi had the plumbing issue and hayley was maybe finishing up her bits..
but if we want to get this finished rendered AND composited (which falls on me and sam) by friday then we need to pull our act together.
I plan to have completed my camera moves by tomorrow ready to render in mental ray in the DOCK by the end of tomorrow.
What do you guys want to have finished by the end of tomorrow. lets make a schedule and stick to it. Allocating time for steves work too.
Maybe plan to have all scenes, lighitng, textures, animation finished by wednesday so that we can have thursday to render perhaps?
Lydia
Andi Bennett 01 March at 21:14 Reply
im gunna be working from home tomorrow as im tinkering with my statue. should be good just to hand over all files on wednesday though.
Matt Vadis 01 March at 22:35 Reply
Me too, will be working at home tom. The sooner I finish Steve's unit the sooner I can help with what's left to be done. Doing animation this late is out of the question. I'll try and get some sort of animatic done for thurs, but I wouldn't hold your breath, sorry to disappoint. Leave me a message if you need something before thurs.
Hayley Allen 02 March at 01:34 Reply
Hey guys, sorry i didnt come in Ive had a very productive day at home. Pretty much everything is done for me, just got to play around with the water reflectivity, and also where do you want the wall hangings placed?
Tombs are done, fire goes around the main section, just got to animate the oil a lil bit. erm water is there just doesnt reflect, boat is built and ready to be animated - what sort of time frame do we reckon for it to go through the entrance to Lydia's section or shall I wait until weds? Lydia I also did fire for ur section if u want to use it or not i do not mind. The sword is textured ready to add to Andi statue too.
Sooo... im good to go just need to put all the bits together. I will help with the compositing too.
Hope everyone is well :) xxx
Hayley Allen 02 March at 01:36 Reply
Oh also it will be best for us to render in layers i reckon or diff sections, so we can have all our laptops rendering different things at the same time. I reckon we should get it all done by the end of weds leaving thurs to composite.
Btw has anyone looked into sounds or music? If not I will get some sfx tomorrow xx
Lydia Fabian 02 March at 08:55
Hey, sound isn't actually mentioed in the brief so we wouldn't be marked down but it'd be nicer to have it. thats like if we have spare time.. so whoeer wants to they may work on that.
rendering as layers works for me, i dnt fancy my mac being unusable. we're in mental ray too..
unless sam doesnt use the light i created and something else about the fire i whipped up. mine or hayleys to use im not fussed either.
anyone set up on renderfarm yet? i dont get it :(
Lydia Fabian 02 March at 21:49
EVERYONE - in tomorrow at 11?
alex is ill so we can set up renderfarm ourselves or render from our machines.. it's not at shit as people say.. well not from what i've been doing. just means we can sort our blogs whilst rendering if need be, or just hit the EMERALD lab and render on those machines. sounds better that way actually.
Hayley Allen 02 March at 21:53 Reply
Hey yeah thats fine by me :) am quite excitd to see it come together x
Sent via Facebook Mobile
Andi Bennett 02 March at 21:55 Reply
ditto.
Matt Vadis 03 March at 12:24 Reply
hi guys, didn't see much point in going in today since I have nothing to render or add to the scene, however before you all throw a wobbly, will you have a video file of everything by the end of the day? I mean the fly through FOR ALL SCENES done and dusted without compositing, because if you do then I should grab it off you so I can draw over it, that's the only way I can animate.
If yes, then please send it to me, or if it's too big i'll come in late in the day bout 3ish if any of you are still about. If no then there's not a lot I can do, only a storyboard. I'm finishing steve's unit today, if i get the video fly through by the end of today, i'll devote the whole of tomorrow to the animation, so we can then composite on friday, if everyone's okay with that. If not then just assume that I don't have any work and get your stuff ready for hand-in.
Matt Vadis 04 March at 12:59 Reply
Okay I've made a decision and you're not going to like it, I won't have any work for friday, i'm working on steve's unit and having a load of problems with syncing frame rates, making the backgrounds transparent etc. so I will have my hands full with this. Not much more I can tell you except i'll be glad to see the back of this unit. I don't like letting you guys down, nothing personal and if you don't like it don't work with me next time. Peace crackers.
Lydia Fabian 04 March at 13:56
so are you not going to help us render out then i presume...
im thinking its no skin off my nose if you don't produce any work.. just maybe we all couldve done things differently.
good luck with steves unit
Andi Bennett 04 March at 21:57 Reply
GUYS EMERGENCY!!!
tried loading up the files i nicked from sammy, none of the textures are there on mine... ?
Hayley you copied the file are yours working? I tried all the files, they just come up white on mine. Is it my MAYA? Is it time to panic?
Lydia Fabian 04 March at 21:59
did you set the project.
Andi Bennett 04 March at 22:14 Reply
... lydia, when you die may i shag your brain?
Lydia Fabian 04 March at 22:41
lol. i have been your little savior for the past few weeks lol
Andi Bennett 04 March at 23:22 Reply
i shall bake you something... soup? cake? i could place a stripper in the cake with a bowl of chorizo soup?
Lydia Fabian 04 March at 23:39
screw the stripper.. soup but maybe we should make a cake or something new on sat?
Matt Vadis 05 March at 00:00 Reply
This is what i'm talking about, quite dark in one camera. Light in another
Matt Vadis 05 March at 00:00 Reply
PICTURE MISSING
Hayley Allen 05 March at 02:02 Reply
Matt i cant see your pic on my phone, andi if you are stil up you need to select each object, go to the lambert etc in its attribute editor, go to where you upload files n then find the 1 it needs. they are all in the source images folder x
Sent via Facebook Mobile
Matt Vadis 05 March at 02:15 Reply
thanks hayley, i'll look into it a bit later, but i don't want to skank it up further than it is. Not sure which objects to select or what lambert it needs, prob best to wait till the morning so we can do it right.
Hayley Allen 05 March at 02:19 Reply
U wil need the ones whch are white. and when you get to where you upload files the names of the pics will already be there so u knw what to assign :). 2mz is guna be fun... x
Sent via Facebook Mobile
Matt Vadis 05 March at 02:36 Reply
ye that's what i thought to do, but if there's a mistake it'll be a waste of time, and time that i'm now using to finish steve's unit. I'm leavin it till morning, It'll be tight but it took under 3 hours to do it once, so i think we get it done.
Andi Bennett 05 March at 07:09 Reply
hey guys... my render took 7 hours. the textures on the stepping stones and the the base of the fountain remained black. I can't rerender as i now need to do steve project. It doesn't look so bad, i figure if i blog about it it explains it.
Sam Mcguire 05 March at 07:28 Reply
hey im getting in fo 9.30 unless everyone got a perfect render last nite i think we need to cut our loses and just playblast cos tbh we still need to edit an we are having too many render issues i dont like it but its all we can practically afford to do. cos you all know if we try to render we will go past the deadline im just thinking practically
Lydia Fabian 05 March at 08:35
i didnt render as i knew it wouldnt work.
hayley its not that the textures arent htere. the scene isnt white. me n matt have the same file. its not that. the textures show in the render view window.. soooo..
matt do ou know how long it took to render your three cameras?
Wednesday, 3 March 2010
Rendered out tests.
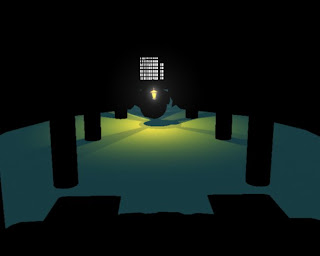
Here are just some rendered tests from maya to get a feel for the camera moves in action.
Love this shot as the lighting looks awesome when moving past the pillars.
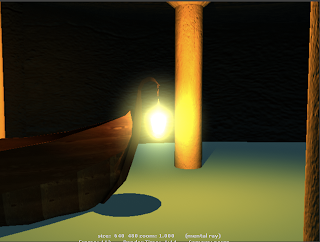
For the side shot i think this needs to be longer which i could do in AE, the picture though shows what look we get with hayleys boat in and the water.. although we need to figure out how to control the shader intensity for the light as in my opinion it just burns the scene, it's not subtle creepy.. it's to much.
The boat coming into the dock, the camera needs to continue a bit further to the dock where it ends, so that we're ready for the next shot line up..
This shot i need to try rendering out so that there is only the torch light bobbing about as we watch it approach the plinth before lighting.
The fire light shot may work better with Hayleys fire because mine is rather smokey, we have thought to combine the two and see what comes of it..
The exit scene i think is all well.
I have given Hayley the file to work on so she can add her fire and boat to the scene and tinker away with that.. meanwhile.. i have nothing really more to do for this project today until it's time to help render out or composit.
As far as i know i believe that Sam will be working on the camera movements in the main castle scene.
When that's done i will write my everlasting evaluation of this project.
Storyboard Cave/Dock
So after my shot list i quickly drew some storyboards which i have numbered and i will annotate accordingly.
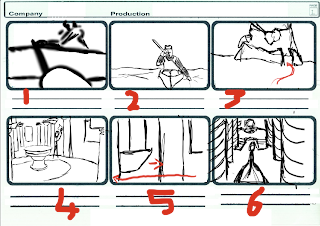
1. Arthur and paddle, book illustration
2. Arthur character shot from the front, book illustration
3. Castle illustration.
4. Behind the plinth shot to see the boat coming in past gate.
5. Low boat shot, where camera moves left as the boat in moving right -opposite.
6. From behind the boat as we're coming in to moor.

7 & 8 - Low pan shot from boat height, pans around behind the pillar and onto plinth as the light bobble's to the plinth.
9. Close up as the fire is lit and we see the prophecy covered over in the background.
10. Character walks forward to prophecy - camera still from behind fire.
11. Camera cuts to side shot showing character face and prophecy.
12. Camera then tracks from same shot as it follows the light, to up the stairs.
Tuesday, 2 March 2010
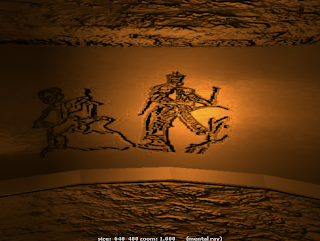
Prophecy bump mapping
For the prophecy i have taken the inspiration from the photo's Hayley took at the museum earlier in the term.
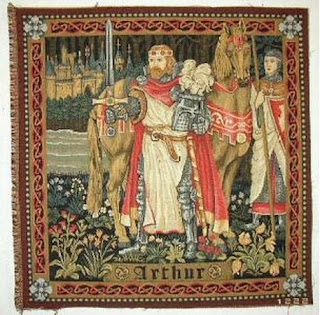
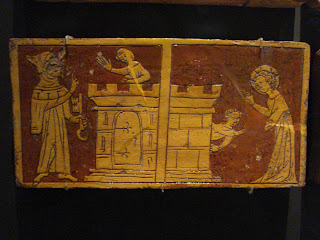
I really like the use of just two colours here, and that it's not plain black and white. The chiseled illustrations look really clean with the use of simple lines, the proportions are not to scale and alltogether we have a flat looking picture with no depth percetion.
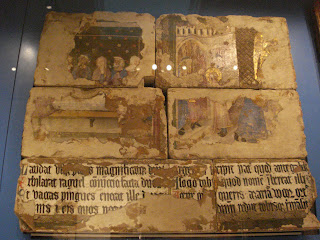
I love how the paint is crumbling and peeling off and how it's cast over the bricks.
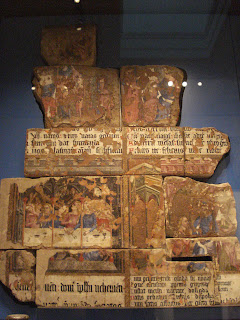
The main colours on this are blue and red, royal and religious colours. Calligraphy text telling us whats going on in the painted scene.
So for my prophecy, i want to combine the 2d flat images with the engraved look, i plan to do this by drawing my images in photoshop and maybe try applying them as a bump to get the engraved look.
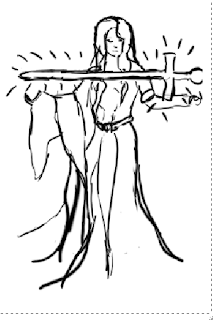
Prophecy Illustrations.
Arthur Sword in the Stone
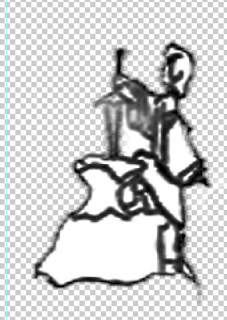
Arthur as King

Lady of the Lake with Excalibur
Adding the texture
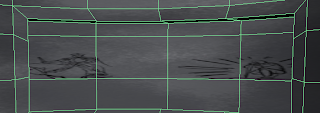
So firstly i positioned the images onto the uv snapshot for the colour texture. The images came out distorted which was because my uv snapshot wasn't clear on the faces. I guess in the long run i should have just changed the UV map but i didn't want to have to shuffle the whole bump for the wall ext, though i think you can maybe create a new UV set and do it that way. But basically i kept what i already had and found the scales that fit the uv snapshot.

Here i tried the bump map whilst the colour texture is on too, we can see the difference and i prefer the bump instantly, it draws more attention.
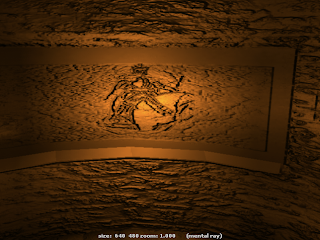
So i thought i should stick a quick volume light in so we can see what's going on. I tried applying that bump of the flaking paint texture i found on the website i got the concrete from, but it's not really happening ..
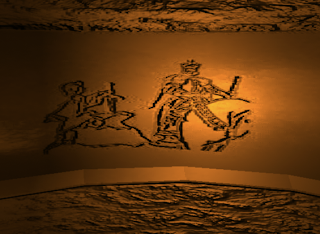
So i thought to just try using a concrete bump for a minimal effect, also in the bump for the prophecy drawings i noticed that it's not as clear as i'd like so i sorted out that in photoshop..
.. and the image looks more even on the bump now.

My first illustration of Lady of the Lake didn't turn out very well as there were too many lines on the photoshop file and it's just not very clear at all.

So after cleaning up the lines i think this works much better.
Ideally if i had more time i would have loved to explore the variety of effects i could have done to bring this out more.


I really like the use of just two colours here, and that it's not plain black and white. The chiseled illustrations look really clean with the use of simple lines, the proportions are not to scale and alltogether we have a flat looking picture with no depth percetion.

I love how the paint is crumbling and peeling off and how it's cast over the bricks.

The main colours on this are blue and red, royal and religious colours. Calligraphy text telling us whats going on in the painted scene.
So for my prophecy, i want to combine the 2d flat images with the engraved look, i plan to do this by drawing my images in photoshop and maybe try applying them as a bump to get the engraved look.
Prophecy Illustrations.
Arthur Sword in the Stone

Arthur as King

Lady of the Lake with Excalibur

Adding the texture

So firstly i positioned the images onto the uv snapshot for the colour texture. The images came out distorted which was because my uv snapshot wasn't clear on the faces. I guess in the long run i should have just changed the UV map but i didn't want to have to shuffle the whole bump for the wall ext, though i think you can maybe create a new UV set and do it that way. But basically i kept what i already had and found the scales that fit the uv snapshot.

Here i tried the bump map whilst the colour texture is on too, we can see the difference and i prefer the bump instantly, it draws more attention.

So i thought i should stick a quick volume light in so we can see what's going on. I tried applying that bump of the flaking paint texture i found on the website i got the concrete from, but it's not really happening ..

So i thought to just try using a concrete bump for a minimal effect, also in the bump for the prophecy drawings i noticed that it's not as clear as i'd like so i sorted out that in photoshop..

.. and the image looks more even on the bump now.

My first illustration of Lady of the Lake didn't turn out very well as there were too many lines on the photoshop file and it's just not very clear at all.

So after cleaning up the lines i think this works much better.
Ideally if i had more time i would have loved to explore the variety of effects i could have done to bring this out more.
Shot List
Just to confirm what i am doing, i will rough out a quick story board perhaps but i am feeling confident and clear on what i need from this shot list.
Shot List*
-Begins with a book, few illustrations, and sound of Arthur paddling in on the boat, tight shots.
- Establishing shot illustration of castle from low view point
- Through cave tunnel entrance - nice lighting from boat lantern FRONT
- Side boat and pillar shot
- Boat heading to moore - BEHIND
- Pan low from boat to behind pillar as we see the light looking at the prophecy, and turns to light fire
- Low on fire shot which burns in front of Arthur and has the prophecy in the background, Arthur turns
- Side on shot showing Arthur looking at Prophecy, camera more aimed on prophecy.
- Camera pans side ways and forward a little whilst Arthur heads up the staircase
Fire Volume Light
To cover the way i have lit my scene, i have used a volume light, changed its 'light shape' from a sphere to a cylinder so that i could control where the light would hit. I changed the colour of the light to an orange which sets the glow on the scene. For the shadows i put on the 'Ray Trace Shadows' to make it less grainy, also by turning on 'Final Gathering' in the mental ray render settings.
Before Ray Trace Shadows

With Ray Trace Shadows and Final Gathering.

So i'm thinking for the boat light as it's coming into the dock to use a sphere for the light shape so that it hits more of the scene, whereas if i used a cylinder shape the light doesn't illuminate the scene enough to get the perspective i wanted.
Below is the volume light set to cover the whole room


With the volume light scaled smaller to the room we can see the drastic effects.


I have used the volume light for lighting the steps leading up to Andi's section and also for the light cast from the torch when looking at the prophecy bit.
Working with Bump Maps
I have been working on bump mapping my scene to give it the old grainy, musky look. To do this i will be combining the lighting and textures to get the effect i want.

Wall Texture

I found an awesome website which has plenty of high resolution images of walls, brick, wood, water, stone ect. So i came across this ruined brick photo and though to give it a test with the bump mapping.

So taking my uv snapshot and applying the brick texture over the top in another layer in photoshop.

Until i came out with with a covered uv snapshot like the above picture.

But when i applied the bump to the object, i realized i needed to re UV map the wall so that the bit on the far left matches up with the whole right section. This is so i can have clean textures with no seams, and when i come to put my prophecy on the wall all will hopefully work well.

I then went to deleted the window looking space from the bump map which covered the prophecy stone section.

Somewhere along sorting out the textures my bump map moved and i had missing patches of the bump texture. Which i thought if i used this in the right way and combined it with another bump i could get a look where the brick has been chopped away.

Just having a VERY quick play around here and i didn;t match the sections up perfectly, i had just tried to add the wall as the texture underneath the bump. Then i thought to get on with all else that needed to be done.

So in the end i worked out where the prophecy space needed to be and just bumped the rest of the wall.
I think this brick works really well for the look i talked about, the two photo's below were taken at Rochester Castle but unfortunately the resolution of the image was too low to work with.


Saturday, 27 February 2010
Lighting Test Moon
Ok so i wanted to try lighting the main scene but the file i got off same keeps crashing, so i tried the moonlight lighting on my scene so i can see what it will look like. I can control the colour by changing the temperature (The higher the number we go blue.. the lower the number we're orange/red), and the time of day by the intensity (the lower the number darker the scene, the higher the number the brighter the scene)
Temperature 12000, Intensity 0.5

This is great for a cloudy dark night scene.
Temperature 4000, intensity 1

This is a nice sand stormy morning look
Temperature 12000, Intensity 2

This is really nice blue, and the shadows are cast well over the mosaic
Temperature 12000, Intensity 8

This is like a sun burnout shot which could look nice as a transition between castle in the olden days, or like a ghostly feel, where we see arthur snapshots burn in and out.

So here we are with a shadow and the beginning of the light for the fire

from the experimentation with the fire, i decided to see what the scene would look like with the moonlight and firelight combined, i'm loving how half the scene has been lit by the directional light, and the other by the volume light on the fire in orange.
Friday, 26 February 2010
Fluid Fire
So meanwhile i was just looking for tutorials on how to light my scene in a fire way.
I need to think of the different way's fire moves..
Towards the end of this video we get fire on top of a dish/plinth. So i found the tutorial to have a little look at how it lights the scene whether it gives 'that' look.
Below are some shots of me creating the flame using dynamics>fluid effects>create 3d container, and then fiddled about with all sorts of settings.


So after tweaking settings i added a volume light to act as the light from the fire. I used a volume light and changed the light shape to a cylinder so i can control where the light hits in the room. also changed the light colour to an orange glow, the lihgt is placed where the fire is.
The photo below is just using the volume light with a low intensity.

Here by upping the volume light intensity we get to see the room, though not the stairs through the door.

One thing i want to play with some more if i have the time is to maybe figure out how to animate the light so that it isn;t static when the fire is flickering. I am thinking maybe to set the light to an infinity and animating the light intensity to a flicker but this might look pretty tacky. Also the flame needs to be faster, and in the video at the top of this post there is a way to light the whole top of the fire plinth, this is by selecting both the 3d container and the fire plinth object, add/edit contents>emit from object

I was trying to play ith the flame here to make it less puffy looking. Not very successful.
Texturing the mosaic
With the mosaic floor i have positioned it into place, the centre longer bricks are actually higher so i had to figure out how to simply un-combine the bricks and lower that section so it fits.

Uv Snapshot of the mosaic

To UV i just selected the top faces and used the planar map then using photoshop i painted on the layers keeping in mind to have the Clone Wars style/look/influence.
First attempt with the texture, bit too light for my liking.

So this darker version fits better, hoping it will look nice with the fire lighting.

One of my worries is if i texture the other areas in this room without the modeled bricks will it kill the consistency? Though i had a little test with applying more brick and the room looked too busy in my opinion.
Subscribe to:
Comments (Atom)